Are you struggling to understand how your website is performing? Do you want to know more about your audience and their behavior? If so, it’s time to set up analytics and tracking for your WordPress website.
But where do you start? This guide will walk you through the process of setting up and managing website analytics and tracking on your WordPress site. From the basics of Google Analytics to more advanced tracking techniques, we’ve got you covered.
Why Track Your Website Analytics?
Before we dive into how to set up and manage website analytics and tracking, let’s first take a look at why it’s important to do so.
- Understand Your Audience: By tracking your website analytics, you can gain valuable insights into who your audience is, where they’re coming from, and what they’re interested in.
- Improve User Experience: Analytics can help you identify areas of your website that may be causing frustration for your users, giving you the opportunity to make improvements.
- Optimize Conversion Rates: By tracking conversions, you can identify which pages and elements on your website are most effective at converting visitors into customers.
- Measure Marketing Efforts: Analytics can help you measure the success of your marketing campaigns, allowing you to make data-driven decisions about where to focus your efforts.
Now that we’ve covered why tracking your website analytics is important, let’s move on to how to do it.
Setting Up Google Analytics
Google Analytics is one of the most popular website analytics tools available. It’s free to use and provides a wealth of information about your website’s performance. Here’s how to set it up:
- Create a Google Analytics Account: If you don’t already have a Google Analytics account, you’ll need to create one. Go to analytics.google.com and follow the prompts to create an account.
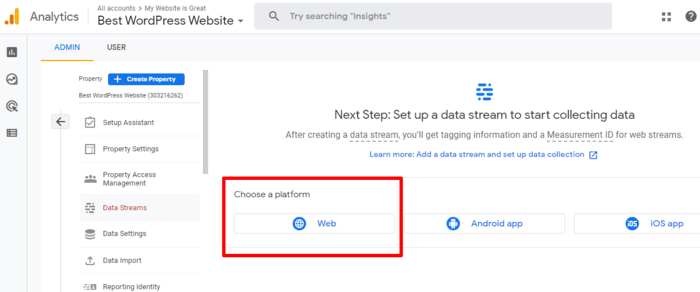
- Set Up a Property: Once you’ve created an account, you’ll need to set up a property for your website. Click on “Admin” in the bottom left-hand corner of the screen, then click on “Create Property”. Follow the prompts to add your website’s URL and other relevant information.
- Install the Tracking Code: Google Analytics provides a tracking code that you’ll need to install on your website. There are a few different ways to do this, but the easiest is to use a plugin like MonsterInsights. Install and activate the plugin, then follow the prompts to connect it to your Google Analytics account.
- Verify Tracking: Once you’ve installed the tracking code, you’ll need to verify that it’s working properly. Go back to your Google Analytics account and click on “Real-Time” in the left-hand menu. Visit your website in a new tab and make sure that you see data showing up in the Real-Time report.
Congratulations! You’ve successfully set up Google Analytics on your website. Now let’s move on to some advanced tracking techniques.
Advanced Tracking Techniques
While Google Analytics provides a wealth of information about your website’s performance, there are some things that it can’t track out of the box. Here are some advanced tracking techniques that you can use to gain even more insights into your website’s performance.
- Event Tracking: Event tracking allows you to track specific actions that users take on your website, such as clicking on a button or watching a video. To set up event tracking, you’ll need to add some code to your website and configure it in Google Analytics.
- Custom Dimensions: Custom dimensions allow you to track additional information about your users, such as their age, gender, or interests. To set up custom dimensions, you’ll need to add some code to your website and configure it in Google Analytics.
- E-commerce Tracking: If you sell products on your website, e-commerce tracking allows you to track sales, revenue, and other metrics. To set up e-commerce tracking, you’ll need to add some code to your website and configure it in Google Analytics.
- User ID Tracking: User ID tracking allows you to track individual users across multiple devices and sessions. To set up user ID tracking, you’ll need to add some code to your website and configure it in Google Analytics.
By using these advanced tracking techniques, you can gain even more insights into your website’s performance and improve your user experience.
Managing Your Analytics Data
Now that you’ve set up website analytics and tracking on your WordPress site, it’s important to manage your data effectively. Here are some tips for doing so:
- Set Up Goals: Goals allow you to track specific actions that users take on your website, such as filling out a form or making a purchase. Set up goals in Google Analytics to help you measure the success of your website.
- Create Custom Reports: Google Analytics provides a wide range of standard reports, but you may want to create custom reports to get more specific information about your website’s performance. Use the Custom Reports feature in Google Analytics to create reports that are tailored to your needs.
- Monitor Your Data Regularly: It’s important to monitor your analytics data on a regular basis to identify any issues or trends. Set up alerts in Google Analytics to notify you when certain metrics reach a certain threshold.
- Use Your Data to Make Decisions: Finally, use your analytics data to make data-driven decisions about your website. Whether it’s improving your user experience, optimizing your conversion rates, or measuring the success of your marketing campaigns, your analytics data can help you make informed decisions.
In conclusion, setting up and managing website analytics and tracking on your WordPress site is essential for understanding your audience, improving your user experience, optimizing your conversion rates, and measuring the success of your marketing efforts. By following the steps outlined in this guide, you can set up Google Analytics and use advanced tracking techniques to gain even more insights into your website’s performance. Remember to manage your data effectively and use it to make data-driven decisions about your website.